For those who might want to record audio over two channels, such as one track containing audio from your mic and one track containing audio from a Skype call, as when conducting an interview, here is one way to do this inexpensively. There are apps and hardware devices you can buy, but I wanted to be able to record an interview using inexpensive (free) software. After a bit of trial and error, here’s the setup that seems to work best for me.
The software I’ll be using is:
- Garageband, free on OS X
- Soundflower, free
- Linein, free
- Skype, free
I’ll also be using an external microphone, the Rode Podcaster USB Dynamic Microphone, but you can use your computer’s builtin mic if you want to.
Garageband
-
Create two tracks. We will configure these below so that one track will capture the audio from your mic, and the other track will record the audio from Skype (i.e., the other person talking).
-
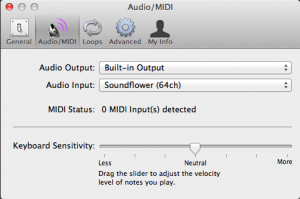
Under Garageband –> Preferences –> Audio/MIDI, select “Soundflower (64ch)” for Audio Input. You can leave Audio Output as “Built-in Output”.

-
Enable multitrack recording by clicking Garageband –> Track –> Enable Multitrack Recoding
-
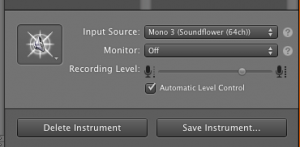
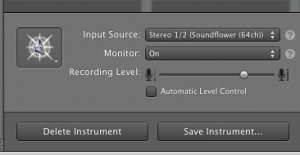
For the first track, show the Track Info panel. Select the type of track effects you want for the track that captures your mic audio. Change the Input Source to be Mono 3 and select Monitor to be OFF. Save this instrument as “SKYPE LOCAL”.

SKYPE
- Open your conferencing software. Here, I’ll be using Skype.
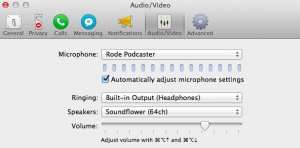
- Under Preferences –> Audio/Video, select the desired mic you want to use under Microphone, select “Soundflower (64ch)” under speakers, and select “Built-in Output (Headphones)” under Ringing. The latter was to not have the ringing recorded, though on my setup it was recorded. I’ll update this if I figure out what I am missing.

### LINEIN
1. Change Linein’s input to be the same you selected in Skype. Change the output to be “Soundflower (64ch)”
[<img src="http://www.kendallgiles.com/wp-content/uploads/2012/10/Screen-Shot-2012-10-15-at-3.31.27-PM-300x98.png" alt="Linein Input and output settings" title="Linein Input and output settings" width="300" height="98" class="aligncenter size-medium wp-image-3966" srcset="https://www.kendallgiles.com/wp-content/uploads/2012/10/Screen-Shot-2012-10-15-at-3.31.27-PM-300x98.png 300w, https://www.kendallgiles.com/wp-content/uploads/2012/10/Screen-Shot-2012-10-15-at-3.31.27-PM-400x130.png 400w, https://www.kendallgiles.com/wp-content/uploads/2012/10/Screen-Shot-2012-10-15-at-3.31.27-PM.png 449w" sizes="(max-width: 300px) 100vw, 300px" />](http://www.kendallgiles.com/wp-content/uploads/2012/10/Screen-Shot-2012-10-15-at-3.31.27-PM.png)
2. Under Advanced, for the input, set the right and left channels to 1. Set the output left and right channels to 3. Click OK.
[<img src="http://www.kendallgiles.com/wp-content/uploads/2012/10/Screen-Shot-2012-10-15-at-3.32.38-PM-300x298.png" alt="Linein Advanced settings" title="Linein Advanced settings" width="300" height="298" class="aligncenter size-medium wp-image-3967" srcset="https://www.kendallgiles.com/wp-content/uploads/2012/10/Screen-Shot-2012-10-15-at-3.32.38-PM-300x298.png 300w, https://www.kendallgiles.com/wp-content/uploads/2012/10/Screen-Shot-2012-10-15-at-3.32.38-PM-150x150.png 150w, https://www.kendallgiles.com/wp-content/uploads/2012/10/Screen-Shot-2012-10-15-at-3.32.38-PM.png 350w" sizes="(max-width: 300px) 100vw, 300px" />](http://www.kendallgiles.com/wp-content/uploads/2012/10/Screen-Shot-2012-10-15-at-3.32.38-PM.png)
3. Click “Pass Thru”. When you speak into your mic, you should see inputs on both sides of the Pass Thru button.
[<img src="http://www.kendallgiles.com/wp-content/uploads/2012/10/Screen-Shot-2012-10-15-at-3.33.48-PM-300x96.png" alt="Lineine Pass Thru" title="Lineine Pass Thru" width="300" height="96" class="aligncenter size-medium wp-image-3968" srcset="https://www.kendallgiles.com/wp-content/uploads/2012/10/Screen-Shot-2012-10-15-at-3.33.48-PM-300x96.png 300w, https://www.kendallgiles.com/wp-content/uploads/2012/10/Screen-Shot-2012-10-15-at-3.33.48-PM-400x128.png 400w, https://www.kendallgiles.com/wp-content/uploads/2012/10/Screen-Shot-2012-10-15-at-3.33.48-PM.png 447w" sizes="(max-width: 300px) 100vw, 300px" />](http://www.kendallgiles.com/wp-content/uploads/2012/10/Screen-Shot-2012-10-15-at-3.33.48-PM.png)
### OS X System Preferences –> Sound
1. Under the Input tab, select the same mic you selected above. Under the Output tab, select “headphones” or whatever device you are monitoring things with.
Back to Garageband, make sure both tracks are enabled – the red dots on both tracks should be lit. If one is not lit, click it.
[<img src="http://www.kendallgiles.com/wp-content/uploads/2012/10/garageband_both_tracks_selected-300x108.png" alt="Garageband - both tracks must be active" title="garageband_both_tracks_selected" width="300" height="108" class="aligncenter size-medium wp-image-3969" srcset="https://www.kendallgiles.com/wp-content/uploads/2012/10/garageband_both_tracks_selected-300x108.png 300w, https://www.kendallgiles.com/wp-content/uploads/2012/10/garageband_both_tracks_selected-400x144.png 400w, https://www.kendallgiles.com/wp-content/uploads/2012/10/garageband_both_tracks_selected.png 473w" sizes="(max-width: 300px) 100vw, 300px" />](http://www.kendallgiles.com/wp-content/uploads/2012/10/garageband_both_tracks_selected.png)
Finally, click record in Garageband, start your Skype call, and you should see both tracks being recorded.
[<img src="http://www.kendallgiles.com/wp-content/uploads/2012/10/Screen-Shot-2012-10-15-at-3.43.30-PM-300x110.png" alt="multitrack recording using Garageband, Linein, and Soundflower" title="multitrack recording using Garageband, Linein, and Soundflower" width="300" height="110" class="aligncenter size-medium wp-image-3971" srcset="https://www.kendallgiles.com/wp-content/uploads/2012/10/Screen-Shot-2012-10-15-at-3.43.30-PM-300x110.png 300w, https://www.kendallgiles.com/wp-content/uploads/2012/10/Screen-Shot-2012-10-15-at-3.43.30-PM-400x147.png 400w, https://www.kendallgiles.com/wp-content/uploads/2012/10/Screen-Shot-2012-10-15-at-3.43.30-PM.png 525w" sizes="(max-width: 300px) 100vw, 300px" />](http://www.kendallgiles.com/wp-content/uploads/2012/10/Screen-Shot-2012-10-15-at-3.43.30-PM.png)
Note that you can tweak the device volume settings so that the recording levels of your mic and the Skype audio are satisfactory.
You can also use a sound editor, such as Audacity, to help make for a more professional recording, by editing each track separately and then combining into a finished recording.